kingroon Posted December 15, 2021 Share Posted December 15, 2021 Hi All, First Post on here, so wanted to say Hello..! I have owned a 1994 4Runner with the 3.0 V6 Petrol Engine and Manual Gearbox, for a few years, enjoying it immensely and appreciating its Retro Looks.. Needs a bit of tidying obviously, but otherwise is a smooth runner.. You can tell by the Photo below that I love it.. Anyways, looking forward to sharing, quizzing and hopefully helping others on here..! Quote Link to comment Share on other sites More sharing options...
RUToyota Posted December 15, 2021 Share Posted December 15, 2021 Hello Matt..welcome...I love my 3.0 V6 too.!! 1 Quote Link to comment Share on other sites More sharing options...
kingroon Posted December 17, 2021 Author Share Posted December 17, 2021 Thanks @RUToyota 🙂 Quote Link to comment Share on other sites More sharing options...
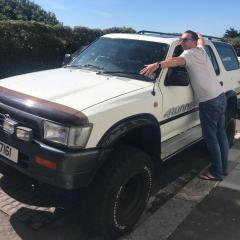
kingroon Posted December 20, 2021 Author Share Posted December 20, 2021 Clifftop Photo Opp.. Quote Link to comment Share on other sites More sharing options...
kingroon Posted January 27, 2022 Author Share Posted January 27, 2022 Thought I'd tackle Cleaning the Engine Bay this morning..! Used Chris Fix's Video as a Guide / for Helpful Tips etc. Quote Link to comment Share on other sites More sharing options...
RUToyota Posted January 27, 2022 Share Posted January 27, 2022 Nice job. 1 Quote Link to comment Share on other sites More sharing options...
kingroon Posted February 17, 2022 Author Share Posted February 17, 2022 Nervous Hour or so as I put my 4Runner up on the Lift for some Rust Work Assessment.. Actually looked better under there than I was expecting, although there is quite a bit of work to be done, at least it wasn't a case of Too Far Gone.. Quote Link to comment Share on other sites More sharing options...
kingroon Posted February 17, 2022 Author Share Posted February 17, 2022 Snapped a nice Sunset Photo on the way Home.. Quote Link to comment Share on other sites More sharing options...
Bernard Foy Posted February 27, 2022 Share Posted February 27, 2022 Welcome Matt to the TOC. Looks like a real love affair going on there 👏. 1 Quote Link to comment Share on other sites More sharing options...
kingroon Posted June 6, 2022 Author Share Posted June 6, 2022 Fast Forward to June, and the Love Affair continues.. Removed the Flares and Side Decals revealing a less than ideal Body requiring some Rust Treatment..! Bought a new set of Wheels and Tyres from 4x4Tyres too, went up to 17" to remove some of the Boaty Feeling.. 2 Quote Link to comment Share on other sites More sharing options...
kingroon Posted January 15 Author Share Posted January 15 ..and continuing with what happened, in September 2022.. With the Decals removed, I decided with abandon to remove both the Collision Protective Rubber Strips and Raptor style Paint from as much of the Bodywork as possible; the latter despite the fact that the Body was to be Sand Blasted during the Restoration; I just like doing stuff. Used the most Environmentally Friendly product, which meant more Elbow Grease.. Also set about removing the Bumper Flares, since the Wheel Arch Flares had already gone.. Need to Angle Grind those fixings off.. Removed the Spots too, they were shockingly wired up.. The combined result was quite pleasing.. Attached Files Quote Link to comment Share on other sites More sharing options...
kingroon Posted January 15 Author Share Posted January 15 Fast Forward to Late Spring 2023.. So, about that Body Off Restoration.. Once the Chassis and Body were separated, I made the decision to do a Chassis Replacement since the condition of the one I had was in need of a lot of repair.. So, coupla Hundred Pounds later, a Chassis turned from eBay and the resto began in earnest.. New Chassis was stripped, prepped, Red Oxide and then 2K Satin Painted Black.. Starting with refurbishing the ancillaries such as Spare Wheel Carrier, then moving on to the Fuel Tank & Cage, Chassis Bump Stops and Steering Box.. Then on to the the Fuel and Brake Lines.. Quote Link to comment Share on other sites More sharing options...
kingroon Posted January 15 Author Share Posted January 15 Rear Axle focus next, removing the Surface Corrosion then treated the same as the Chassis with a 2K finish.. Fitted with new Springs, Dampers, and waiting on refurbished Upper & Lower Trailing Arms.. Came up pretty good.. Will be finished off with an all new Rear Braking System.. Quote Link to comment Share on other sites More sharing options...
kingroon Posted January 15 Author Share Posted January 15 IFS setup next, new Uppers, Lowers [inc. Ball Joints], Pedders Torsion Bars & Dampers.. The 4Runner will have [as before] a 2" Suspension Lift [although I am removing the 2" Body Lift, returning to Stock].. Sitting Pretty.. Quote Link to comment Share on other sites More sharing options...
kingroon Posted January 15 Author Share Posted January 15 Time to focus some of the attention to the Rear Axle, and fitment of new Bearings, Back Plates and Brakes.. At last, separated..! Now, the rebuild.. Quote Link to comment Share on other sites More sharing options...
kingroon Posted January 15 Author Share Posted January 15 Work has resumed this week, came across an issue when uniting the 3VZE Motor with the replacement Chassis - Engine Mounts.. Nothing a bit of Grinding & Welding won't sort, but a Speed Bump nonetheless.. There was a tinge of regret at having scrapped the original Chassis already, but I had to remind myself that that thing was shot and I was better having some Fabrication done that salvaging from the old Rusty Skeleton.. Quote Link to comment Share on other sites More sharing options...
kingroon Posted January 15 Author Share Posted January 15 Attention has turned to the Engine this past week: Timing Belt, Water Pump, Gaskets, Plugs, Leads & Gaskets.. Essentially, a Major Service..! And Essential it was..!! I was [and still am] a little embarrassed about the state of the Engine, and how really it had not been looked after.. I have kept the Fluids under a watchful eye, but really, there were issues that were as close to Breaking Point as they could get without a Catastrophic Roadside event.. The Water Pump had been sealed with Bathroom Sealant, not a Gasket.. How the F£%& this had held for as long as it did was miraculous.. The Dizzy Cap points were brittle and came away with little persuasion.. Basically, it was on its Last Legs.. Fortunately it was going to receive a New Everything.. Quote Link to comment Share on other sites More sharing options...
kingroon Posted January 15 Author Share Posted January 15 The Exhaust System was to be overhauled, with the removal of the Crossover Pipe in favour of Headers, and an EGR Delete.. Because of the introduction of Stainless Steel to the Engine Bay., it was decided to Heatwrap them to protect everything else in there.. A little Surgery would be required, as the length of the Union Pipe meant that there would be insufficient room for the Silencer/Muffler, the Catalytic Converter and the Tail Pipe.. Quote Link to comment Share on other sites More sharing options...
RUToyota Posted January 15 Share Posted January 15 You are certainly putting alot of work into that, Matt...well done you... You'll have great truck when your finished.!"👍 1 Quote Link to comment Share on other sites More sharing options...
kingroon Posted January 15 Author Share Posted January 15 Installed and in place on the Chassis, there was an issue with the length of the SS Union section, putting the Cat and Silencer too rearward.. A problem for another day, when the Body and Chassis were reunited and a path could be sorted for the entire Exhaust.. In the meantime, plenty to get on with.. Quote Link to comment Share on other sites More sharing options...
kingroon Posted January 15 Author Share Posted January 15 Chassis and Engine work had gone as far as it could without needing to rely on the reunion to the Body.. Had better get the Body sorted then..! This was quite a bit of Work ahead.. Wirewheeling the Underbody back, it was coated in Red Oxide to protect.. ..but it was clear that the Inner & Outer Arches, Sills and Dog Legs were FUBAR and needed replacing.. ..so replacement Sections were required.. One Phonecall to a Breaker later.. Cutting away at the Beast Outer Arches to also remove the Inner Arch panels and Lower Rear Quarters.. Quote Link to comment Share on other sites More sharing options...
kingroon Posted January 15 Author Share Posted January 15 Wanna see a Nearside Sill rebuild..? Thought so.. Quote Link to comment Share on other sites More sharing options...
kingroon Posted January 15 Author Share Posted January 15 And an Offside Lower Rear Quarter Rebuild..? Oh yeah.. Quote Link to comment Share on other sites More sharing options...
kingroon Posted January 15 Author Share Posted January 15 Outer Arches & Dog Legs done too.. Quote Link to comment Share on other sites More sharing options...
kingroon Posted January 15 Author Share Posted January 15 A few Patches to repair some Holes in the Front Inner Arches, nothing that required substantial Surgery.. ..also.. Whole Underbody then Seam Sealed and Red Oxide treated, ready for Paint.. Quote Link to comment Share on other sites More sharing options...


Recommended Posts
Toyota Official Store
Sponsored Ad
Name: eBay
Toyota Model: Toyota Store
Toyota Year: 2024
Latest Deals
Toyota Official Store for genuine Toyota parts & accessoriesDisclaimer: As the club is an eBay Partner, The club may be compensated if you make a purchase via eBay links
Join the conversation
You can post now and register later. If you have an account, sign in now to post with your account.