Leaderboard


Popular Content
Showing content with the highest reputation on 06/21/2013 in all areas
-
I'll try and fill in some of the gaps that the Toyota guides can furnish you with already. If there's anything obviously missing, just drop a comment here and I'll do my best to answer it for you. The Toyota link (Which I've found invaluable so far) is http://www.toyota-tech.eu/ To start. Remove the door runners and kick plates by simply giving them a good yank (There's going to be a lot of that throughout BTW). Then get on your knees (Both sides of the car and you'll find a bolt at the bottom of the plastic trim near the floor: In the passenger footwell the plastic below the black rounded edge should now pull out. Start at the bottom on the left and work upwards. Then work across the top and down the RH side. It should just come away. The back of the panel looks like this (If it helps for clip placement). View is upside down as it would clip back in as you revolved it upwards from the bottom of the pic (If that makes sense). You are left with something like this: Underneath the steering wheel the plastic trim has a rectangle in the middle. This is an airbag and you DO NOT need to remove it !!!!! Again, work around it taking out any obvious bolts and either remove, or as I've done, leave it hanging into the footwell. Time to pop out the ends of the dash front, here And the same the other side. If it helps. Pull the door rubbers away from the door surround to give you access. MAKE SURE they are pushed fully back before you shut the doors again. Back to the passenger footwell. The big black bit (The soft dash front) can now pull clear. This bit: Grab it both sides at the bottom and pull directly towards you. With that out. The same can now be done with the speedo surround and cover. Again pull towards you and it'll pop out. Leaving this: That's Part 1 for now folks. I'll try and get in a few more pictures to explain more as I go. Any questions, as I say, please feel free. Si1 point
-
Very good idea, you know that a club member will appreciate the vehicle.1 point
-
Received my chip box from Kingo (thanks John) fitted it this morning and after a 20 mile drive all I can say is the car is now a pleasure to drive. Plenty of power on hand pushing me back in my seat and making the short but steep hills around here tame. When I have had my fun using the extra power I will revert to normal driving and see if there are any mpg gains. Looking forward also to dragging my tin hut to Southport mid July and enjoying the extra power.1 point
-
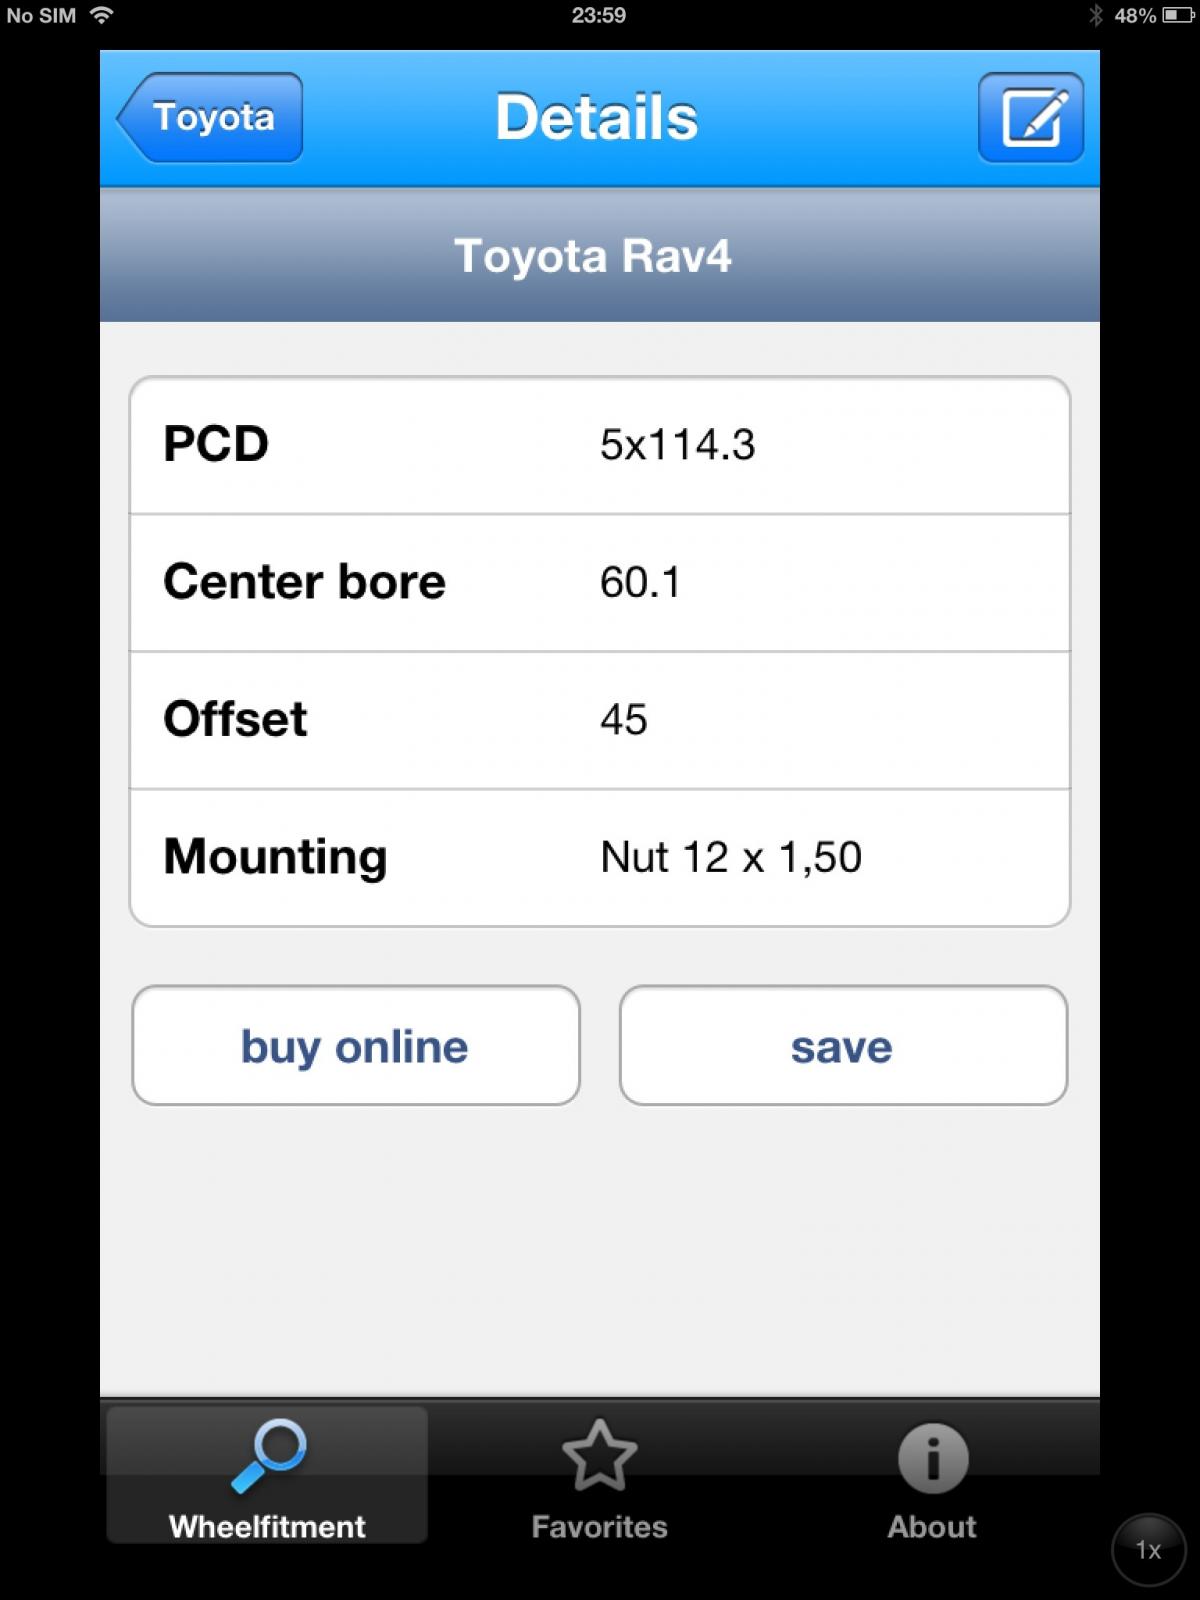
Here is some info re the RAV 4.2 Wheels .... You could get the old wheels sorted out and looking smart again for less then the cost of those wheels you are looking at and would be able to avoid possible insurance complications with change of spec, etc. :) Also, the links for both the new wheels proposed, or the wheel size info, have no mentions of the Centre Bore size? It is VITAL that is correct as too small and the wheel cannot be fitted, and if too large, it will be unsafe and eventually the bolts will sheer off. EDIT: this is for RAV4.2 Wheels as per posters vehicle (RAV4.3 has identical requirements though!)
 1 point
 -
I am the owner of a Prius taxi in Spain and had to replace the battery at 179.000kms. Toyota does not want to pay for the replacement even when the cleaning of the cooling fan was not recommended nor done in the maintenance service for severe use. I have downloaded the Toyota US recommendation for legal procedure. Many thanks.1 point
-
Well. Here it is. The fruit of all my cut hands, blue aired , maybe badly idea'd plan that has taken about 2 years of planning, time, and resources to come to fruition. I know it's not everybody's taste but its the start of the next part of my loooooonnnngggg plans Carbon fibre wrap over the dash. All little vents are coloured matt black to take away the purple plastic that was left on show. Opinions please, Si1 point
-
1 point
-
Here's a little taster while I get all the photo's onto photo bucket. That's how it ended up before any work restarted & it all got put together again Si1 point
-
Amethyst had one and took back as found out it had been repaired once i put my paint gauge on it and removed all the pdi gunk. Collecting another amethyst soon. Only two colours were our choice white and amethyst love the orange but to new for our price range. Liking the dacuma grey is it that im not sure is still only on the IQ. For me the interior has to suit the car and not sure on the plum colour on the white but when viewing the white ones its very evident of the colour difference between the plastic bumpers and the metal panels, especially the light colours and the pearls in particular. Toyota just never seam to have been able to paint the plastic bumpers of there cars to match perfectly the metal panels. When we came to sell the aygo in blue ice it looked so bad the bloke thought they had been resprayed and wanted a discount to get them to match, man there all like it.1 point