All Activity
- Past hour
-
 Tuee joined the community
 -
is that 2.2 ohms or 2.2k ohms (2200 ohms)
-

Windows 10 Update Error 0XC19001E2
tedgillispie replied to Ikmar's topic in General Club Discussions
The conflict with Dell Encryption Management Service and Dell Digital Library Service sounds like a likely culprit. Try disabling or uninstalling these services before updating. If you're considering an upgrade, a windows 11 pro retail key might be a good solution to bypass these update headaches altogether. -
We had a 63 auris and were paying 700 in kt3(renewed in February) - currently paying 1300 for the 2020Rav4,
-
My 2019 2.5l hybrid does around 500 miles with mixed driving. UK
-
I've noted that the audio level of rear speakers is lower than front ones That at least on 8" TT2 of MY20/21 Yaris. I've no idea if newer multimedia systems behave differently.
-
https://www.ebay.co.uk/itm/401883268522
-
I've just tested the crankshaft sensor with a new metre and a reading of 2.19/2.20 ohms, I had suspicion my other metre was faulty, is that reading ok
-
I also have to turn down the bass and increase treble on all my speakers for my aging ears to hear speech clearly. I have done this with my 6 speaker yaris, and also biased it more to the front speakers as the rears sound muffled to me. This helps enormously.
-
 Shane Hurley joined the community
 -

Strange message on drivers display screen
Louie replied to Louie's topic in Corolla & Corolla Cross Club
Tony not just yet i am parting company with it late July while waiting for my VW which is currently being built in Portugal. I am an old VW fan from old but parted company with that make about 5 years ago because I fancied a change now going back. I really dont want to spend my time looking through 166 pages of Toyota blurb. I have a shortened 33 page version which i procured from this site but cant find anything relating to that problem. To be honest i have gone past the stage of taking any notice of silly in car messages including the rubbish MT app. -
Maybe you should check the error codes with obd scanner and try to delete them. Or just take negative connector off the battery for a while. May not solve the issue but worth to try anyway..
-

SIM card for sat Nav Toyota auto x 2016
MikeJacksons replied to Ang17d's topic in Aygo & Aygo X Club
You should be able to buy a replacement SIM card, but it might depend on the specific model of your device. Usually, it's just a matter of removing the old one and popping in the new one, but it's always a good idea to double-check the instructions or consult with the manufacturer if you're unsure. - Today
-
olive oil and cotton wool, or Otex and cotton wool works wonders - Do not use Q-tips
-
Maybe increase treble and reduce bass, helps my ageing ears. You could check if there is an equaliser function where you can bias voice. With a 6 speaker system I would be surprised if there wasn't.
-
Hi, we have just got our son a 2010 Toyota Aygo Blue and cannot figure out how the Bluetooth works! As I understand it, Bluetooth did come as standard with this model and it has a little panel up behind the rearview mirror. It doesn't look like any of the pictures I have found online, but it is similar to the Parrot device. Anyway, all we can get it to do is say 'connecting' when we press one of the buttons with a green light, but it doesn't connect and we can't get it to do anything else! I also can't find a manual anywhere online to tell me how it works! Maybe it's disconnected, who knows but I am hopeful in so far that it does say it's connecting! If anyone has any instructions/manual for the device I would really appreciate it, can't find anything in the cars user manual.
-

Water inside boot lid (behind tail gate light cluster)
flash22 replied to Steve_tkz's topic in Aygo & Aygo X Club
it's a common issue a new light fixes the problem - water gets past the seal and runs down the inside of the tailgate into the spare wheel well when driven or parked on a slope -
Even worst for me. Paid £400 last year, now the quotes are coming at around a £1000. Not only that, some refuse to insure (like LV=) with error message 'we don't insure this type of car'. And I only have an old Auris hybrid. I have read somewhere online that some insurers might put a blanket ban on all Lexus just because some of them are easy to steal. Not sure why my Toyota is affected, though. Catalytic converters' theft?

-
 TheBluePeril joined the community
 -
 manoj prakash joined the community
 -
 Walkes1 joined the community
 -
Car won’t start unless jumped despite having full battery
hind replied to Mike Gray's topic in Yaris & Yaris Cross Club
Yes, this is true, but the power draw from just the comm module being active is much smaller than from active GPS receiver unit 🙂 -
What car is it for? Read the owners manual and make sure you've got the recommended grade. 15w40 mineral isn't going to be good enough for anything built within the last 10 years. Mixing different viscosities is OK as long as they're both within spec for the engine, but I personally wouldn't be using any mineral oil in this day and age, not on a modern engine. I wouldn't recommend extracting the old oil with a pump, either. It takes longer and doesn't get to the nasty stuff sitting in the bottom of the sump. Much easier to take the plug out and drain it - you'll be going underneath to change the filter anyway, right? I can tell that you want to save money, but don't even think about skipping the filter!
-
 stevie-n joined the community
 -

Yaris Cross 2023- TAS 600-DCM600 - hidden features
Al-Kibir2017 replied to Al-Kibir2017's topic in Yaris GR / GRNM club
The following has caveats. Ignore the manual or consult it online at Toyota Tech, Europe. there are no warning messages on the New Car Features at all. I believe Toyota Europe does not want buyers to know too much. In fact Toyota Europe do not work the same way as Toyota Japan. I am disappointed myself. Anyway. Here it is. This is for when one needs to run the ICE engine, test anything etc. NOT FOR DRIVING. USE AT YOUR OWN PERIL AND RESPONSAVILITY. Having said that. We live in a free world which carriers try to monopolise at our costs. Fight it. • ACTIVATING 2WD MAINTENANCE MODE (for HV Model) Tip • Refer to the New Car Features manual for the warning messages which are displayed on the multi-information display when maintenance mode is entered. • The engine speed increases to 1500 rpm when the accelerator pedal is depressed midway with the shift lever is in P or park (P) selected. When the accelerator pedal is depressed more than midway, or when the accelerator pedal is fully depressed, the engine speed will increase to approximately 2500 rpm. a. NOT USING THE GTS: i. Perform the following steps within 60 seconds. 1. Turn the ignition switch to ON. 2. Move the shift lever to P or select park (P) and fully depress the accelerator pedal twice. 3. Move the shift lever to N or select neutral (N) and fully depress the accelerator pedal twice. 4. Move the shift lever to P or select park (P) and fully depress the accelerator pedal twice. ii. Start the engine by turning the ignition switch ON (READY) while depressing the brake pedal. iii. Check that the 2WD maintenance mode message is displayed on the multi-information display. b. USING THE GTS: i. Connect the GTS to the DLC3. ii. Turn the ignition switch to ON. iii. Turn the GTS on. iv. Enter following menus: Powertrain / Hybrid Control / Utility / Inspection Mode - 2WD for measuring Exhaust Gas. v. Start the engine by turning the ignition switch ON (READY) while depressing the brake pedal. vi. Check that the 2WD maintenance mode message is displayed on the multi-information display. • ACTIVATING 2WD CERTIFICATION MODE (for HV Model) Tip Refer to the New Car Features manual for the warning messages which are displayed on the multi-information display when certification mode is entered. a. NOT USING THE GTS: i. Perform the following steps within 60 seconds. 1. Turn the ignition switch to ON. 2. Move the shift lever to P or select park (P) and fully depress the accelerator pedal 3 times. 3. Move the shift lever to N or select neutral (N) and fully depress the accelerator pedal 3 times. 4. Move the shift lever to P or select park (P) and fully depress the accelerator pedal 3 times. ii. Turn the ignition switch ON (READY) while depressing the brake pedal. iii. Check that the 2WD certification mode message is displayed on the multi-information display. b. USING THE GTS: i. Connect the GTS to the DLC3. ii. Turn the ignition switch to ON. iii. Turn the GTS on. iv. Enter following menus: Powertrain / Hybrid Control / Utility / Inspection Mode - 2WD for cutting TRC. v. Turn the ignition switch ON (READY) while depressing the brake pedal. vi. Check that the 2WD certification mode message is displayed on the multi-information display. • START DIAGNOSTIC MODE Tip • Illustrations may differ from the actual vehicle screen depending on the device settings and options. Therefore, some detailed areas may not be shown exactly the same as on the actual vehicle screen. • Start diagnostic mode at least 90 seconds after turning the ignition switch to ON. Otherwise, some items cannot be checked. a. There are 4 methods to start diagnostic mode. Start diagnostic mode by using one of them. b. Method 1 i. Turn the ignition switch to ON. ii. While pressing and holding the "AUDIO" switch, operate the light control switch: Off → Tail → Off → Tail → Off → Tail → Off. iii. Diagnostic mode will start and the "Service Menu" screen will be displayed. c. Method 2 i. Enter the following menus: Body Electrical / Navigation System / Utility / Diagnostic Mode. Body Electrical > Navigation System > Utility Tester Display Diagnostic Mode ii. Diagnostic mode will start and the "Service Menu" screen will be displayed. d. Method 3 i. Turn the ignition switch to ON. ii. With the screen and audio turned off. Press the seek/track up panel switch 5 times and then press the seek/track down panel switch 5 times Tip Diagnostic mode can only be started if the above operation is completed within 15 seconds of the first press of the seek/track up panel switch. If the operation is not completed within 15 seconds of the first press of the seek/track panel switch or fails, turn the screen and audio on and then off again before attempting to start diagnostic mode. iii. Diagnostic mode will start and the "Service Menu" screen will be displayed. e. Method 4 Note: o Do not touch the multi-display except when necessary. ii. Since the multi-display may recognize a pinch in/out or flick operation if operated with 2 fingers, always use 1 finger to operate it in diagnostic mode. turn the ignition switch to ON. iii. f. With the screen and audio turned off as shown in the illustration, Perform a flick operation on the multi-display screen from the left to the right 5 times and then perform a flick operation from the right to left 5 times Tip Diagnostic mode can only be started if the above operation is completed within 15 seconds of the first flick from the left to the right. If the operation is not completed within 15 seconds of the first flick from the left to the right or fails, turn the screen and audio on and then off before attempting to start diagnostic mode again. Flick operations can be recognized anywhere within the touch area of the multi-display screen. ii. Diagnostic mode will start and the "Service Menu" screen will be displayed. • FAILURE DIAGNOSIS The "Failure Diagnosis" screen will be displayed by selecting "Failure Diagnosis" on the "Service Menu" screen. • SYSTEM CHECK The "System Check Mode" screen will be displayed by selecting "System Check" on the "Failure Diagnosis" screen. • CHECK DTC (CHECK USING SYSTEM CHECK MODE SCREEN) a. System check mode screen description Screen Description Display Content *a: Device name list No. 1 o Device Name List No. 1 displays some of the devices that make up the navigation system. o The names of the components from Device Name List No. 1 are shown in the following table. *b: Check result Result codes for all devices are displayed. *c: Memory clear o Present and history DTCs and registered connected device names are cleared. o Select "Memory CLR" for 3 seconds. *d: Recheck o A system check will be performed again after the memory is cleared. o "Recheck" will dim during a system check. *a: Device Name List No. 1 Description Name Component Connection Method DCU Radio and display receiver assembly - MEU Navigation ECU USB communication line *b: Check Result Description Result Meaning Action OK The device does not respond with a DTC. - DETAIL The device responds with a DTC. Read the DTCs on the "Unit Check Mode" screen. NCON The device was previously present, but did not respond in diagnostic mode. o Check the vehicle wire harness. o Check the power supply circuit of the device. NRES The device responded in diagnostic mode, but gives no DTC information.* b. Unit check mode screen description Screen Description Display Content *a: Device name Target device *b: History DTC Diagnostic memory results and stored DTCs are displayed. *c: Present DTC DTCs output in the service check are displayed. *d: DTC DTC (Diagnostic Trouble Code) *e: Diagnosis clear Selecting "Code CLR" for 3 seconds clears the diagnostic memory data of the target device (both diagnostic system check result and the displayed data are cleared). Tip o This screen is updated once per second. o A maximum of 6 DTCs can be displayed for history and present DTCs. c. Read the system check result. i. If the check result is "DETAIL", select the displayed check result to view the results on the "Unit Check Mode" screen and record them. Note: A maximum of 6 DTCs can be displayed for history and present DTCs on the "Unit Check Mode" screen. Therefore, when 6 DTCs are displayed, troubleshoot those DTCs first and then check the "Unit Check Mode" screen again to see if any other DTCs are displayed. Tip When all results are "OK", no DTCs are present. When proceeding to view the results of another device, select "Back" to return to the "System Check Mode" screen. Repeat the above step to view the results of other devices. ii. Check the details of the DTC(s). Click here • DTC CLEAR/RECHECK (CLEAR USING SYSTEM CHECK MODE SCREEN) a. Clear the DTCs i. Select "Memory CLR" for 3 seconds. ii. Check that the check results are cleared. Tip To clear the DTCs for a specific device, use the "Unit Check Mode" screen. When clearing the DTCs using the "Unit Check Mode" screen, select "Code CLR" for 3 seconds. b. Recheck i. Select "Recheck". ii. Check that all diagnostic codes are "OK" when the check results are displayed. If a result other than "OK" is displayed, perform troubleshooting again. Tip When the DTCs are cleared using the "Unit Check Mode" screen, select "Back" to return to the "System Check Mode" screen and perform this operation. • FINISH DIAGNOSTIC MODE a. Turn the ignition switch off. -
I let myself be talked into gardix coating by dealer. They do apply to the screens as well. It's surprised me by lasting well with very occasionally applying the "conserver" whatever that is! With hindsight, I would have got a proper company to do it or DIY as the dealer did a pretty shoddy job of prep on the car and of course I paid way too much!
-
The conclusion to this thread is. A fool and his money are soon parted 👍
-
This is definitely effective cost driving. I can't recommend, but from my experience I never had mixed mineral and synthetic. I had mixed different brands but all synthetics. I.e I had some left over of about 1lite of Shell and 5 litre of new Castrol.
-

Water inside boot lid (behind tail gate light cluster)
Jaacob replied to Steve_tkz's topic in Aygo & Aygo X Club
And if the replacement light has the same issue as the rest of the lights that are letting in water and holding it? -
I’m having an annoying issue that I am thinking is possibly being caused by an exhaust leak, randomly when the car is sat idling, I am getting a very fumy smell from outside the car, queuing in traffic that sort of thing. I don’t seem to be able to make it happen on purpose, there is no notable blowing sound, the car seems to drive normally, there is no oil leak, or anything being left on the ground after being parked up. So, my guess is there is a slight leak on the exhaust possibly being caused by all the speedbumps around where I am, and the exhaust is flexing at some point and opening and closing a crack maybe? Any ideas what could be going on or how to diagnose it more. Steve
-
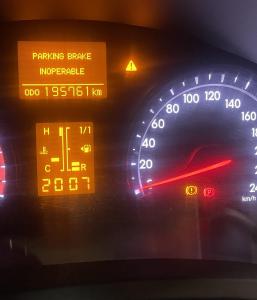
Hi! I am new here, i have a Toyota Avensis 2012 estate, with the error "Parking brake Inoperable" in the dash. The parking brake has been set on when i stop the engine, and loosen as normal when i drive of. But the button has not been working because of the error. I am wondering if anyone have had this error come up, when the brake pads where worn down? And if it went away when you changed brake pads/disks. Does anyone have any suggestions to what it could be. The workshop says its the actuator, but that part hard to get (if possible at all) to get in my country. I really love my Avensis and do not want to get rid of it just because of a parking brake issue. In advance, Thank you. And i am sorry for any writing errors, english is not my first language. Ask if it is anything i am unclear on.


.thumb.jpeg.fcb57b43249d43eaff7c9c86f03b6353.jpeg)