Leaderboard


Popular Content
Showing content with the highest reputation on 06/14/2014 in all areas
-
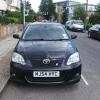
I had to post these photos of my buddies iQ. He did a full body wrap to advertise his company Armored Ink Tattoo. Just looks amazing. I'll have more information coming soon.4 points
-
The middle box on my 2006 Mk3 diesel started blowing recently. I managed to source a KFZ box from skj_shop on eBay, item No: 351011620246. Great service, it arrived in 3 days and only cost around £55 plus £20 postage! Can't complain about that.2 points
-
Good Luck Richard !2 points
-
But seriously, its a thought to get it back to were it was :P I'll start Jonny Wilkinson1 point
-
Time has come where I have to put my hand in my wallet and buy a clutch kit. plus I do no want to leave it until winter. I have a new LuK flywheel already. I can get a genuine clutch kit from Toyota for £160 ish on the trade. or a LuK for £97 from local motor factors. which one should I go for, me being a tight a** I am tempted to go with the cheaper one. I am equipped with the corolla 1cd-ftv haynes manual,avensis t25 workshop manual and most importantly teabags. I will have a friend helping me who has plenty of experience on other cars, first time on a Toyota, he's more of a VAG man. Can anyone give me any advice or what to watch out for etc. I have plenty of time to do it, so no rush. if someone could take a bit of time share their advise it would be grateful.1 point
-
A story... written with only 3 words at a time.... I'll start... One sunny day1 point
-
I have a small tear on the soft top where it folds and sits at the rear. How can I repair this and what do I use.Dave1 point
-
Hi all, Been busy so not been on this site for a few years. Here is a you tube clip to remind some of you of my car and myself! - Restoring her this winter! Gareth1 point
-
Hi all I need some advise.... My 02 t sport is being a nightmare.... Every 2-3 months i get issues with the brakes. They get very hot and i can feel the car pulling back whilst on the move (hence fuel consumption goes up). I take it to my garage (i've been going to for years) and they say its a kooky thing with my car, they clean my brakes up and say that it'll be fine. but low and behold a few months down the line there i am again with the same issue. They said that everything is fine and all i need to do is keep take it back to get them cleaned out now and again... mmmmm this just doesn't seem right to me, i've never had this kind of problem with any of my other cars (toyota's included). I'm not a heavy breaker, i engine break if and when i can... I am on a very tight budget but this back and forth every few months (and yes they charge me to clean them out) seems like just masking a problem to me.. Anyone else had the same issues or has some advise because i slowly starting to hate my car! Thanks - sorry if this sounds a little lame but i'm really stuck..1 point
-
Since the aygo haynes manual is a little shy of info & there is still a demand for this, here is the definitive list; Here's how to reset the MMT brainAYGO MMT RESET.pdf Layout of the partsAYGO MMT PART LAYOUT.pdf System diagramAYGO MMT GEARBOX.pdf Construction & operationAYGO MMT OPS.pdf Function of main components AYGO MMT PART FUNCTION.pdf How the MMT ecu makes decisions (including diagnostic trouble codes DTC ) AYGO MMT SYS OPS.pdf1 point
-
Has anyone used/does use Toyota Motor Insurance via the Toyota UK (owners section) website - would be interested to hear of your experiences and opinions. It is apparently underwritten by Aioi Nissay Dowa Insurance and I must confess to never having heard of them.1 point
-
Now here's a strange question. I have a 2010 1.6 Petrol Manual Verso 5 seater. In the boot behind the seats is this wide box with lid that contains the wheel brace, jack etc. All this stuff would go in a small plastic box or even a carrier bag. This box drives us nuts as it makes a two tier boot which is a nuisance i.e. no completely flat floor. Toyota unbolted and removed it for me so it is not structural.But it not much better without it as the boot floor curves downwards behind the seats. Short of a supported piece of ply to bridge the downward curve I am stuck for ideas and may have to put the darn box back. Any ideas would be welcome as it is a strange design feature I have never come across in a car before. Many thanks Jeffery1 point
-
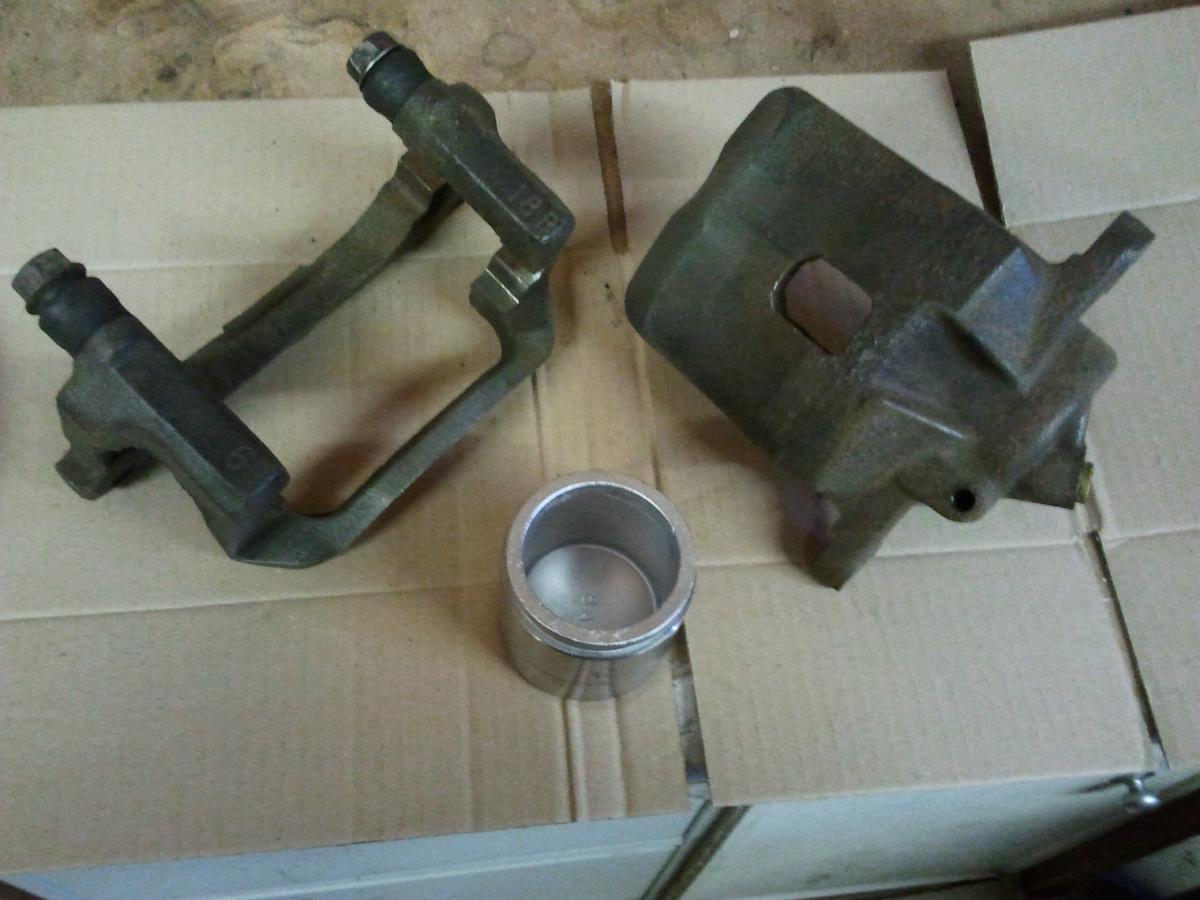
Hi Guys First post, with apologies if this has been covered before. I have had a good look around and I cant find the answer. I have rebuilt the rear brakes, discs, callipers, shoes, pads etc. I have set up the handbrake as per diagrams/instruction on here and the downloaded manual I have. I believe that a new handbrake cable was fitted prior to me buying the car. The problem is that very occasionally the handbrake shoes on the right side seem to "slip" against the drum! This results in a rubbing noise and the back end shaking. If I play around with the handbrake lever it seems to eventually reset and is ok for a few days. The shoes only have 1 tension spring at the bottom which flexes around the bottom of the adjuster - I have noticed on a couple of diagrams that there seems to be 2 springs? However, the new fitting set I purchased only has the 3 longer springs for securing the shoes 2 top. 1 bottom. Occasionally I get a clunk from the right rear on set off, so could there be a cable problem. Though once released I cant get how this would then affect shoe movement?? Like most DIYers I have been really careful cleaning/greasing where appropriate and the shoes do seem very easy to slide around, and was wondering if indeed there should be 2 springs at the bottom of the shoes? The car hasnt had much TLC over its lifetime and I would be grateful if anyone would have further suggestions? Thanks Steve1 point
-
Hi all, not been around for a long time on here! A family members got a 2006 avensis that has a vibrating/rattle type noise from 1000-2000 ish rpm that happens both in gear driving and at idle. Best way to describe it wouod be a loose aluminium cover vibrating rapidly? Do have a video but not sure if im able to put it up here? Thanks in advance for any suggestions1 point
-
My 2004 Avensis has a full working air-con on the passenger side, but on the driver side, doesn't seems to work, or perhaps to a much lesser extent. I assume it's a problem with environmental controls... but no idea where to start ... any ideas??1 point
-
Hello there, I have a 1.0 litre yaris and I am wondering what modifications that I could do to it? I would like to lower it and add a back box however I would like to upgrade some parts under the bonnet! I need some tips and advise into what I could use to improve this?1 point
-
The door switches create an earth when the doors are opened, attached is guide from Toyota for fitting footwell lighting, the kit is plug n play but shows you which plug in the junction box is for the interior lights, from there you should be able to identify the wires you need: http://www.toyota-tech.eu/aimuploads/%7B534A767A-E26C-7D2B-2CEC-996D00D6E26C%7D/Rav4_Interior_Lighting_RHD_08527_42800_AIM_001_435_0.pdf1 point
-
i have just bought a new sony head unit for my toyota aygo but it is not compatible with the built in sat nav, i was just wondering if theres a way of connecting the new head unit to the sat nav so it works how it did with the original head unit1 point
-
Hello David - welcome to Toyota Owners Club. Topic moved to the Celica club.1 point
-
Cheers mate, apologies for the late reply, not checked emails in a few days. Its not the clutch, have already tried that, believe its not the facelifted model (cambelt not chain, no indicators in door mirrors) will check the air con pump and get back to you, will also upload the video to youtube. Thanks again1 point
-
Hi, could anyone tell me where i can get a oil filter for the auto gearbox on my 1997-8 caldina 2 litre non turbo please, i think the avensis maybe different as the caldina is 4wd, also rav 4 gearbox is different thanks1 point
-
Hello I need a little help as to what coolant I should use in my 2004 Diesel Rav4, I want to replace it, the manual does not give any specific specifications, It says to use HOAT coolant basically?? So what ive got so far is.... Toyota long life coolant... Toyota super longlife coolant... The same above but premixed?????? (no much price difference).......am I paying for added water? and then all the other 3rd party makes G05 seems to pop up a lot There are no specs on the Toyota stuff, ie what it contains...yet in the users manual its says to uses HOAT with non of this that or the other added??? what should i go for?1 point
-
Hi all I recently started experiencing a judder when braking on my 57 plate D4D tourer. More pronounced at high speeds. Thinking this was an indication of needing new pads, I have changed these, however the issue still remains. The pads definitely needed changing anyway - as I realised when i took the old ones off. Is this an indication I need new discs also or is this something else that needs looking into? Any advice / experience appreciated. Cheers1 point
-
There must be a significant difference between the yaris and prius yet the official combined is about 70mpg for both? Haven't used my prius in a few days but a 30 mile mixed trip today got me 74mpg. Whilst it doesn't help the yaris drivers I simply can't understand why the difference is so big! I simply drove how I explained a page or 2 back in this thread. My tires are f rated for fuel, Michelin primacy so I might get better mpg with Eco tires. I have them at 40 psi and 38 psi rear, cold pressure slightly lower. I used the pwr range every time I accelerated apart from slow town traffic, quite a lot of ev use there.1 point
-
Previous figures were disappointing (around 40 m.p.g.), and, I suspect will normally continue to be so (most of my trips are 12 - 15 miles return with many queues waiting to use the same bit of road as everyone else. A return trip between South Humberside and Tonbridge, with Shell's best grade 4 star, and fairly frequent use of the air conditioning, gave a figure of about 51 m.p.g.1 point
-
Bobkneale, I try to keep the revs low, but it makes me smile way to much to drive it like an old Mini, so the revs stay fairly high, as does the MPG a win/win situation.1 point
-
Hi, I have a 1997 toyota paseo. The car never came with a key fob when I bought it. I've recently bought a paseo with a 5efhe engine in and it came with a keyfob which worked both lock and unlock on the car. Since I'm scrapping the 2nd one I bought after removing the engine ive coded the keyfob to my other paseo and it unlocks the car but doesn't lock it. I've tried a few times to reprogram it but still have the same problem. I've even tried putting the alarm ecu from under the dash from one car to the other and I still have the same problem. The led on the keyfob lights up when either button is pressed. Any help would be great as I really don't know where to go from here. Thanks1 point
-
With the greatest of respect Omar, you have no idea! Rejecting a car is not a simple task, it is certainly not stress free, and at least "up front" it is not without cost! You have no doubt been treated poorly, your new iQ should have been your pride and joy, and the dealership should never have dealt with you in such a disrespectful manner. In order to reject the car, you have to do so in a reasonable time period, that period is not stated in law, but it is likely to be a short period What I would do would be to document EVERYTHING. Put it all down on paper, what happened, at what time, who you spoke to, as if your life depended on it!! Get that letter sent in WRITING to the Dealer Principle, explaining all the faults, timeline etc, and what outcome you expect. Are you going to reject the car? Tell them, if you want to keep the car, give them a time period where you expect the car to be put back to "as new" state (say 21 days) You then have to tell them what you intend to do if they fail that deadline. i am sure it will not come to that, but do it today, make a note of any out of pocket expenses, if it did come to handing the car back, you are not automatically entitled to compensation, but you are entitled to consequential losses, so if you have any expenses travelling back and forth or car hire, you would be entitled to claim that back Trust me, getting the car put right in a short time frame is the best option, unless of course you have lost complete faith in the car. It is not a quick process and might involve you in having to hire a lawyer for which you would have to pay, and claim back as a consequential loss. Try not to go there if possible, but if you do, you will have to inform them you want to do so on the basis the car is not as described, of satisfactory quality or fit for purpose If you bought the car on Hire Purchase, the HP company take on the responsibility so depending on how you bought the car, you could look at that avenue Good luck Kingo1 point
-
Hi everyone I have had my estima lucida for 3yrs slowly refurbishing her. I love my grand old bus never let me down I have seen a pic of one and it had an awning. Does anyone know where I can obtain one. Thanks Andrew Sent from my iPhone using Toyota OC1 point
-
Hello! I am in need of bucket seats that fit a mk1 toyota yaris! If anyone has any please get in touch!1 point
-
Brilliant Hi-lux advert....1 point
-
I think I am going to cry. from article: The extremely rare, million-dollar coupe was being driven down a road in Toyoama prefecture, Japan 5 pictures, video, and full story .1 point
-
I have now had my lovely GT86 for a couple of weeks now and love it. The only thing that disappoints me is Touch and Go. I could have bought a better product from Halfords for a fifth of the money! The Navigation system is slow to load, calculate and is very crude. But my main gripe is that The Touch and Go is designed for cars with steering wheel controls. To adjust the audio volume is a long stretch to a tiny smooth knob. Most unpleasant. Unless i have missed a trick somewhere. And why could the driving stats be not on the screen as in other Toyotas rather than having to share the same display as the odometer and two trips. I know the design is retro, but has anyone ever looked at the analogue speedo? IMHO the space would be better used with MPG, outside temp and the like! Thoughts?1 point
-
I have an urban cruiser diesel, reg 2012 with 10,000 miles on the clock,as yet I have had no known issues with dpf problems.The only thing I have noticed and not sure if dpf related is from time to time the idle speed increases from 700rpm to 1000rpm.and lasts for a short while no other noticeable fault while this is going on only visible when stationary .I am aware of the problems dpf can give and although my journeys are short I do give the car longer runs when possible.Is there anybody out there who has had dpf problems with the urban cruiser.I do like the cruiser and was not aware of the problems that it causes with Diesel engines when I purchased it, it seems some models fair better than others.Because of my low mileage would it now be the time to trade it for a petrol engine maybe a yaris trend.your comments would be appreciated1 point
-
Agh yes but the BMW has something the iQ doesn't. It only has one lane to use. The Outside Lane Ha Ha David1 point
-
The early Rav4.1 VX had a strut brace highlighted in red in the engine bay, I've always liked that so decided to replicate that with my 4.2, fair bit bit of work getting it out....involves, wipers off, plastic windscreen panel, wiper motor and linkage , water channel etc, anyway after a few coats of toyota super red paint, I'm pleased with the effect, not to everyone's taste...but I'm easy pleased :) Also had a tinker with cam cover polishing, rather hard work by hand , does look a little brighter but now needs to be kept up, or is just dulls over.
 1 point
 -
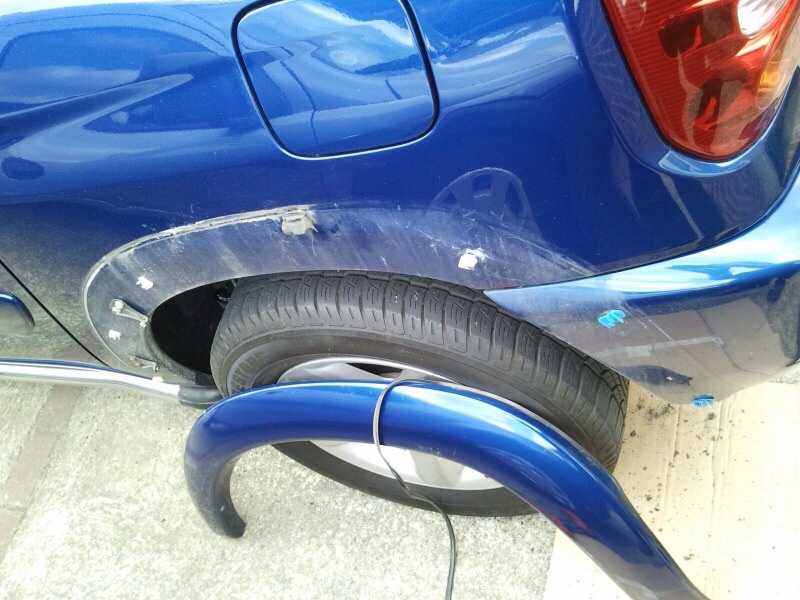
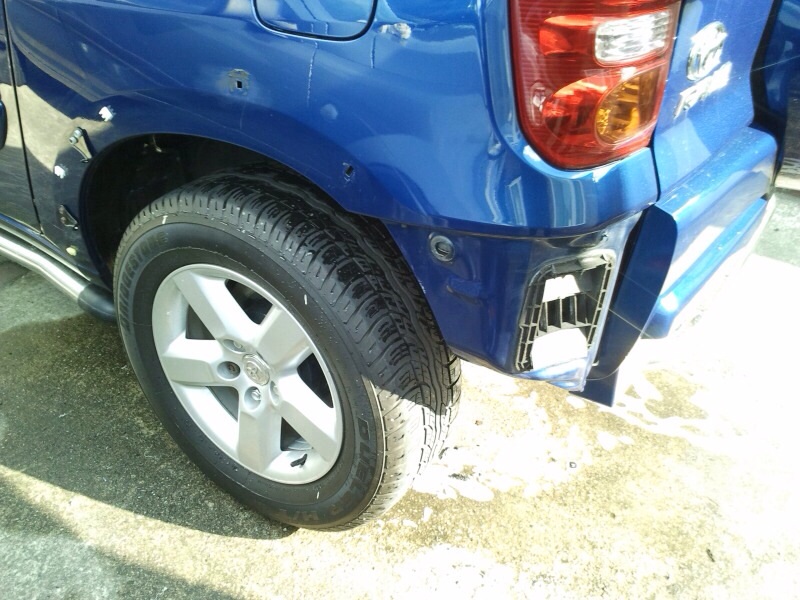
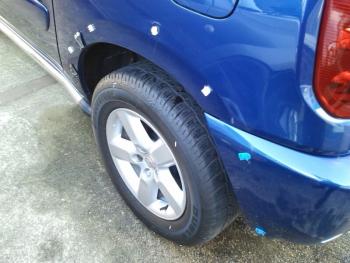
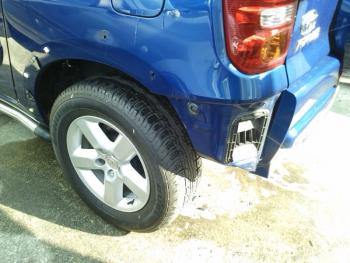
An area of bodywork needed some attention, it was a question of "needs must" so took a look at it myself, it could be a common problem when a 3 door is given a light bump on the rear 1/4 bumpers, it's pushes on the rear flaired arches and breaks the mounting clips, this in turn makes the rubber trim between arch and bodywork dislodge. First was to remove the arch, this has two pop rivets to drill out at front lower edge, remove mudflap or screws were mudflap lives,then pops arch off its clips.

 1 point
 -
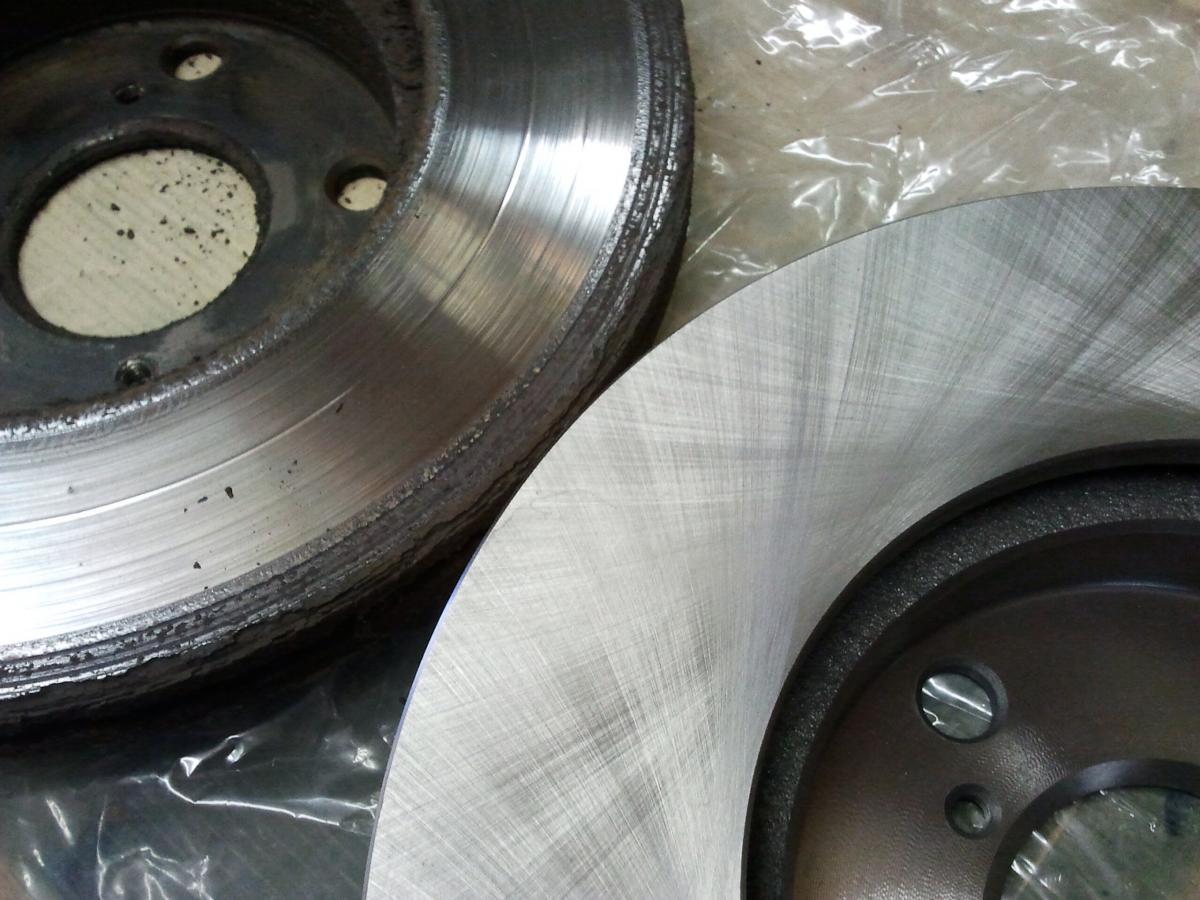
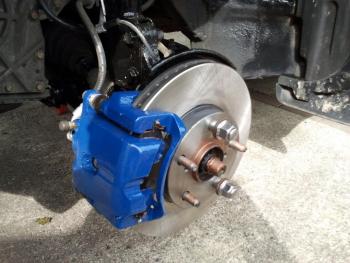
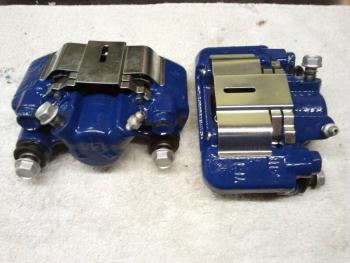
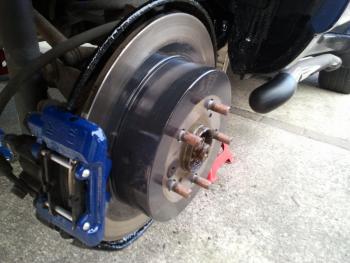
Have enjoyed doing the brake overhaul, new discs and pads all round, plus clips, seals and slider kits. Disclaimer.. As you can see I've used copper slip on wheels studs, that is my choice but you do so at your own risk !


 1 point
 -
Ha ha welcome. Now can i interest you in a interior light mod. Ha Ha ha David1 point
-
Dear Members, I have posted in two other forums: Hilux/Surf, and Imports. I am looking for aftermarket alloys for my Surf. I came across this image, anyone recalls what the make is or where to get them from? Cheers, Asif
 1 point
 -
Had one, but it vanished on its own. Now trying to put it back, or a newer pic, and it simply does not appear. When trying from a photo hosting site, it tells of a server that cannot be contacted. Any help guys?1 point
-
Hi, I have a 4Gb USB stick plugged into the USB port of my 2012 Avensis T-Spirit. When try and use the voice commands to Play a track I keep getting a message saying the media device is syncing. If I had just set off then ok maybe fair enough, but this is still happening after 40mins of driving. If you select the track manually via the touch, touch, touch again screen then it plays the track fine.. but still won't do it via voice commands. WHat on earth is it doing for 40mins at a time !?1 point
-
we used euro car parts here are two links for you http://www.eurocarparts.com/ecp/c/Toyota_Aygo_1.0_2009/p/car-parts/brakes/brake-friction/brake-disc/?104545538&1&4b4fada022075aca438390eacc0513332ca0f901&000027 http://www.eurocarparts.com/ecp/c/Toyota_Aygo_1.0_2009/p/car-parts/car-service-parts/regular-service/brake-pads/?101545628&1&40ddb8e817b9ab0e103225846d3d6aabc93e046d&000036 then use promo code service25 to get 25% off the total bill1 point
-
79 pictures in the gallery1 point
-
From my experience of changing the timing belt, I have slightly modified the instructions from above (sorry Anchorman, hope you don’t mind). All the photos relate as per the previous instructions so I have not repeated them here. Tools I used: Spanners – straight, ring, stepped (swan neck), ratchets, 10mm, 12mm, 14mm, 17mm Sockets (1/2 inch and 1/4 inch) 10mm, 12mm, 14mm (long and short), 17mm, 22mm, Bar and adaptor. Long Nose Pliers Three legged bearing puller Club Hammer (to jolt a nut undone) Jack Selection of 4x4 inch posts and wooden spreader boards (under sump to lift engine) Ramps Wheel chocks Magnetic pick up tool! Enamel touch up paint (to mark timing marks and belt) Extending wheel brace (to undo Camshaft Bolt) Torque Wrench Oil / Copper Grease Thread lock Torch and good lighting Long flat screwdriver (to ease things off) Epoxy glue to repair the foam seal around the upper timing belt cover To start. To make access easier, undo the brackets from the ABS pump. Follow the brake pipes along the inner wing towards the bulkhead and you will see 2 clips. Unbolt the top clip and ease the pipes from the bottom clip (no point in removing the bottom bolt as it won’t help!) Now there is enough flex in the brake pipes to lift the ABS unit up and to the side to give more access for working and to get at the engine mounting bracket later. (Despite following the procedure here, my pump would not shift out of the way without bending a brake pipe, so I made do with an inch or so of movement – which helped). Carefully lift the PAS bottle from its mount being careful not to loose the metal clip behind it. Serpentine belt. Working under the car, look up and you will see the tensioner right at the front near the radiator. With a ring spanner, undo the lock nut (blue arrow) in the centre of the pulley and then lubricate and undo (anticlockwise) that tensioner bolt (green oval) or "jockey" adjuster to wind the tension off the belt (small socket or ratchet spanner). Only back it off far enough to be able to manoeuvre the belt off the pulleys. Mark the belt with chalk to show the direction of rotation and if there are any cracks or splits bin it – trust me you don't want to do this at the side of the road! Upper timing belt cover Use long nose pliers to gently squeeze the clips that hold the wiring loom to the cover and ease them forward (circled) then remove the 10mm bolt heads and remove the cover – it is a fiddle and there are a couple of hidden bolts, one in the middle of the cover in a recess and one down the left side near the bottom of the cover. This cover is a tight fit and you may find it easier to remove the engine mounting bracket first (two nuts underneath engine and one on top, plus three bolts holding the mount to the wing. The top nut will require a deep socket). You may need to jack up the engine an inch or so to remove the mount through the top past the ABS unit. Alternator belt This is the second poly-v belt and is delightfully easy to remove. Just get a 14mm spanner and ease down on the spring loaded centre bolt and pop the belt off. Mark the D.O.R. with chalk and again if there are any signs of deterioration in the belt, bin it. Although this is easy to get off, don't forget the serpentine belt has to come off first. Lower timing belt cover. Fairly straight forward but you will have to remove the spring loaded tensioner for the alternator belt. Just turn the centre bolt anti-clockwise and the pulley pops right off. With the car in 5th gear and handbrake on undo the camshaft pulley bolt, then when loosened use a bearing puller to carefully ease the pulley off the shaft revealing two more 10mm bolts to the lower timing cover. Centre cover. There are six bolts in the bracket which hold it on of which the front two (17mm) go through the power steering pump. They are tight and awkward to get at. In this photo you can see a way of locking two spanners together to get some more purchase, alternatively use a socket and bar for the top one and a spanner for the lower one. It isn't the best use of tools but it works. Take the remaining bolts out of the pump and slide it up and off the bracket. Timing belt. We didn't bother removing the glow plugs. With the car out of gear, turn the upper right pulley to bring the engine timing marks around to the positions shown in the pdf. If you can't see them very well, highlight them with tipex or touch up paint. It may be worth at this point marking the two upper pulleys and belt at specific points, counting the exact number of teeth on the belt between the two markings. I say this as the upper left pulleys timing mark is very difficult to see in the limited space. Undo the two bolts in the tensioner body and allow it to swing to one side and slacken the belt. When the belt is off, (you can wriggle it around the timing belt guide bolt under the top left pulley) check all the pulleys and water pump. It isn't necessary to change any of the pulleys unless they make a noise when you spin them or the water pump unless it feels rough or it shows signs of weeping. NOTE; It is not necessary to remove any of the timing toothed pulleys as shown, this is for engine overhaul purposes only. There are kits available which include the belt and all the main pulleys and a tensioner. Don't take risks as the engine will be wrecked if the belt breaks or comes off. The warning at the beginning of the pdf refers to turning the engine while the belt is off. Doing so risks the pistons contacting the valves and bending them so the simple advice is don't turn anything with the belt off. Take the tensioner to the vice and providing there are no signs of leaking or damage, carefully press the plunger in until you can insert an allen key or pop rivet in to restrain it (keep the plunger upright or horizontal, never upside down). Insert it just far enough to restrain the plunger as it is very hard to remove under the extreme tension. When you are ready to fit the new belt, do it in the order shown and try to avoid any slack between the pulleys as you go. This is easier said than done and took me two attempts to get it right. When the belt is on carefully check the timing marks to see they haven't moved. The lower camshaft pulley has a tiny pin ubik indentation on the timing mark which correlates to the clear line on the engine block. You can see this if you squeeze your head up from below. If they have moved all you can do is take it off and try again but if you envisage where the belt would be if it were a tooth out you will see it will be obvious. If this takes you all day, you must get it right as the camshaft or fuel pump being one tooth out will at best cause it to run really rough. This is where your teeth counting exercise from earlier may come in useful on the upper pulleys. The upper timing mark (top right pulley) is easy to spot but due to the angle you will be looking at it from, just double check it lines up with a right angled hex key held against the two markings. When you are satisfied you have it right, insert the bottom bolt in the tensioner and then turn it until the top one lines up and fit that too. Tighten the two bolts (don’t overdo them – torque settings below!) and then pull out the pin that you fitted in the vice – it is very tight and you may need a blood transfusion when you have finished knocking your knuckles about! When the belt is tensioned you need to rotate the wheel to turn the engine or if you are working off ramps temporarily install the crankshaft bolt. Don't forget that little dished washer with the lip facing outwards. Turn the engine CLOCKWISE twice to allow the belt to settle then check those timing marks again. When you are satisfied everything is OK you can start to build it back up. Clean all the parts and add a drop of oil to the threads of all the bolts. With all these components, fit all of the bolts first then tighten them – especially important with the centre cover. Loosely fix the engine mounting bracket to the engine and then securely tighten them. Lower the engine and then wriggle that engine mounting back in and fit the bolts through the engine mounting bracket. Fit the lower and upper covers, the crankshaft pulley and the belts in reverse order. Note the D.O.R. of the belts and for the serpentine belt it should be firm but you should be able to twist it by near enough 90 degrees on the longest run between pulleys. Refit the ABS pump and the pipe clips then check everything again. Once you are satisfied everything is in place and tight you can start it up. If it whines, you probably have the serpentine belt too tight so check and adjust if necessary. Torque Settings: Lower untoothed timing belt pulley (idler roller) 47Nm Water Pump bolts 31Nm Camshaft Bolt 103 Nm Timing tensioner pulley assembly (8mm Hex key) 35Nm Timing tensioner bolts 21Nm Timing belt guide bolt (if removed) 9Nm Centre timing cover 14mm bolts 37Nm Centre timing cover 17mm bolts 64Nm 10mm Upper timing cover bolts 7Nm 10mm Lower timing cover bolts 4Nm Auxillary belt tensioner pulley fixing bolt 40Nm It may be worth noting that the SKF timing belt kits come with good instructions, diagrams and torque settings. Unfortunately the instructions are copyrighted so I can’t post them here.1 point
-
Hello, I'll publish here some photo and video about Toyotas in 2013 Mauritius National Championship1 point
-
I have used W40 for 30 yrs, and in the old days we used it for the very reason that it did not conduct electricity. We used it to displace water on electrical connection that had a poor reading across terminations.1 point
-
Honda admits renewed F1 interest The head of Honda R&D has told Autocar he hopes the marque can return to Formula One in the future, fuelling speculation it could return when the sport moves to turbocharged engines Honda withdrew from F1 at the end of 2008, but is now thought to be mulling a return The head of Honda R&D has told Autocar he hopes the marque can return to Formula One in the future, fuelling speculation that it is evaluating the new 1.6-litre turbo rules that will be introduced from 2014. Yoshiharu Yamamoto, told Autocar: “On a personal level I love racing, but there is a lot involved when you are in F1 – it is the very top of auto racing and that requires a large commitment. But it is true that we do look up at those races and hope that one day we can take part again. “I do not personally think we can just go straight back immediately, but there is potential for the rules to change and attract us. I follow the rules, certainly, and if they present an opportunity then it would be nice to go back.” Honda recently committed to the World Touring Car Championship (WTCC), where the team will run a 1.6-litre turbocharged engine. As a result, the next Honda Civic Type-R road car, due for launch in 2015, is widely tipped to run a turbocharged engine. In an exclusive interview with Autocar magazine this week Honda president Takanobu Ito has admitted the firm is developing other turbocharged engines for sale in Europe, shifting the firm away from its long-held support of high-revving naturally-aspirated units. That shift could tally with a renewed interest in Formula 1’s revised regulations. However, Yamamoto admitted the firm had to hit other targets before it could consider returning to F1 for the first time since 2008. “This is my personal view – not that of Honda – but I feel the first thing we must do is win in the WTCC, and then perhaps we can look further afield,” he said. http://www.autocar.co.uk/car-news/f1-2012/honda-admits-renewed-f1-interest1 point
-
Sorry to double post but maybe this is of help? http://www.fitaudio.com/?View=entry&EntryID=1391 point
-
I have a 2006 T180 Verso 40k miles and it had the same problems and surfing the internet lead me to looking at the EGR valve which was a simple job to remove and clean ( Yes it needed cleaning as when you remove the valve there are two orifices and one was completely blocked and the other was a 1/4 of the size ). the hardest job was finding which was the correct valve. It lies at the front of the engine, in front of the injectors and has a flex metal pipe running to the cylinder head if is remove using a 12 mm socket and took about half an hour to complete, I will remove again when I have some carb cleaner handy but using a scraper (screw driver) did the trick for now see photos of before and after. so cleaning easy and saved me paying a Toyota Garage £135 for the valve plus labour for renewing the valve :D Hope this Helps1 point