Leaderboard


Popular Content
Showing content with the highest reputation on 03/29/2014 in all areas
-
We'll collected her this morning and already put 100 miles on the clock. 100 miles of pure pleasure too.1 point
-
Hello you two, Yes i'm sure you have, thats a very nice motor and nice to hear you have stuck with Toyota. Pete.1 point
-
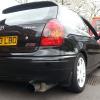
Peter It looks awful!! I suggest you buy a new car David1 point
-
As mentioned,yes short trips will do it. the oil and water will warm up in the engine enough for heat to rise inside and when it reaches the cold surface at the top condensation will form.The oil mist that is created by the valve mechanism then mixes with it. If you wipe out where the oil filler cap sits and then pour some warm water in the cap it'self that will clean it out. As the weather is now warmer this condition should go away Del1 point
-
Top banana!....as they say, well done buddy! I caught a garage out once where starter motors are concerned, they told me mine was knackered, they took it off, cleaned it to perfection, sprayed it with matt black paint to make it look like a re-con, they refitted it and tried to charge for the replacement. Knowing what the garage game can be like i made 3 small marks on a few bits under the bonnet one of which was the starter motor. A few well spoken words to the boss in this back street garage and he just gave me my keys and got the job done for free which included a replacement battery. Result! Mike1691 point
-
Latest- i fixed it. She had squirted wd40 in the key hole and that seemed to sort that. However, the garage tried to pull a fast one by having the starter motor off when she went to get the car after saying no to the £780 in the hope that she would say yes to at least a new starter.. i checked the battery which was dead so i charged it up via jump leads and eventually got it running. Tested it by restarting several times and seems ok now. At worst it may need a new battery. I'm gonna call that garage and give them a piece of my mind.1 point
-
The first thing to say is that this issue is an annoyance rather than a safety related problem - many Rav owners have had the clunk for a while and just tolerate it. You'll find the details for replacing the intermediate shaft in the pinned section at the beginning of the Rav4 forum. Go to technical hints and tips and the article is near the bottom of the 4.3 list. If you search "intermediate steering shaft" - theres loads of previous info. If you wan't to remedy the problem quickly and cheaply, use spline or bearing retainer. Theres loads of different ones and you'll need a low to moderate bond type with a reasonable setting time and a low viscocity so it will flow into the splines. Something like Loctite 648 will be fine. Remove the clamp bolt after marking it's position and wedge open the splined joint. Apply the compound to both sets of splines, allow to flow down the splines and tighten the bolt a few degrees beyond it's previous position.1 point
-
Like many others on this forum,I'm quite happy to help anyone, but I, for one will not respond to a curt list of demands and not a please or thank you in sight!1 point
-
Hi Paul, Make sure the air-con belt is 4PK860. This is the belt fitted on my car. You have already fitted the power steering belt. Next should be the air-con belt, as it is the inner belt. Undo the center bolt on the idler pulley wheel to unlock, then turn the top bolt loosen the tension or move the pulley in to allow the belt to be fitted. Then adjust the idler pulley top bolt to tension the belt. 9 cm deflection between the crankpulley and the air-con compressor. Lock the centre idler pulley bolt. I assume you know the alternator belt set up. This is fitted last. It is 5PK970 on my car. The pictures were taken August 2012 when the crank pulley failed. Konrad
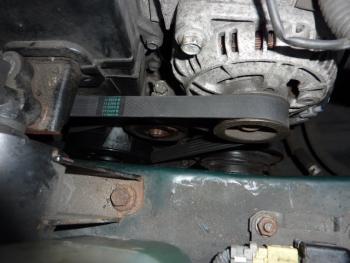
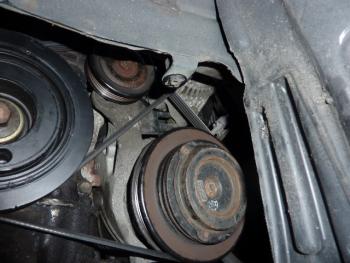
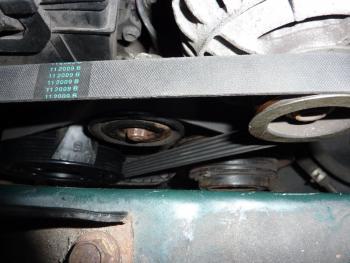
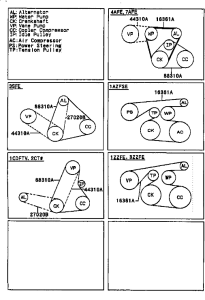 1 point
 -
Why not save then for the winter ? Just a thought as it will save your new ones from any damage1 point
-
I fitted winter tyres on new OEM steel Toyota rims - cost me £120 for 4, from a main Toyota dealer somewhere up north (advertised on ebay). The narrower the (winter) tyre the better in snow, so best to stick with the standard 155/14 Aygo size, rather than a wider tyre.1 point
-
Part # 42611-0H010 x 4 for 14" steel wheel as fitted to lesser Aygo uses 155/65/14T tyres Part # 90942-W2001 x 16 for steel wheel bolts ( different to Alloy wheel type ) PM partsking for prices1 point
-
Great result Seth. Also shows that there are some good Toyota dealers around despite some customers having poor service.1 point
-
Hi Dude Dunno who you are but i like seeing your posts and i admire the passion you have rebuilding your car...............incidently why are you welding up some holes? Mike1691 point
-
Direct fit mate1 point
-
Hi and thanks Konrad C and cmia for the detailed and accurate information dome fuse fixed the alarm issues I have been putting up with for over four years and changing the bulbs in the dash binnacle fixed the illumination the bulbs and fuses had continuity they were a little bit high resistance perhaps changing them may have fixed a bad connection. I have completely changed all the fuses now just for completeness but well done and thanks again very happy1 point
-
They say imitation is the most sincere form of flattery so I guess I should be extremely flattered. Jonathan bought his iQ in early 2012. He was so impressed with watching my build on the internet that he decided to imitate my car. As it turns out he lives about thirty miles from me. I have met Jonathan in person at car shows but have never seen his iQ in person until yesterday. He came over to let me install the sequential LED turn signal side mirror lights for him and photograph the job for a DIY. This is the first time our iQ's have been photographed together...1 point