Leaderboard


Popular Content
Showing content with the highest reputation on 08/09/2019 in all areas
-
Let us hope Toyota tech digits are extracted soon and our "state of the art" Toyota models can catch up with inferior competition who do offer smartphone connectivity? My one and only disappointment with my car.2 points
-
There are loads, most are very boring and the best I have found are: Remote open/close windows Auto rear wiper when front wipers operating and reverse is selected, can be set ON/single wipe , ON/constant wipe , OFF Unfortunately there is no overall list published only small charts of customisations listed under each possible selection e.g lights, locks, Windows , Nav, AC etc, etc. and it would take days to try on collate all of them. Here are lighting options for a Hybrid HB the first chart is settings via Diagnostic computer (GTS) Tester Display Description Default Setting ECU Lighting Time Changes the lighting time of the following lights that are operated by the timer function when the map light assembly door linked switch is on, room light switch LH and room light switch RH of the room light assembly are on*4, and the rear room light (No. 1 room light assembly) switch is set to DOOR*3: Map light assembly Rear room light (No. 1 room light assembly)*3 Room light assembly*4 Front door ambient illumination light (Front door trim board sub-assembly)*1 Rear door ambient illumination light (Rear door trim board sub-assembly)*1*5 Center tray illumination light (Instrument panel light assembly)*1 Cup holder light (Console box pocket garnish)*1 15 s 10:30 s,00:15 s,01:7.5 s Main body ECU (Multiplex network body ECU) I/L when ACC OFF Lights up the following lights automatically when the map light assembly door linked switch is on, room light switch LH and room light switch RH of the room light assembly are on*4, the rear room light (No. 1 room light assembly) switch is set to DOOR*3, and the power switch is turned from on (IG) or on (ACC) to off: Map light assembly Rear room light (No. 1 room light assembly)*3 Room light assembly*4 Front door ambient illumination light (Front door trim board sub-assembly)*1 Rear door ambient illumination light (Rear door trim board sub-assembly)*1*5 Center tray illumination light (Instrument panel light assembly)*1 Cup holder light (Console box pocket garnish)*1 ON 0:OFF,1:ON Main body ECU (Multiplex network body ECU) I/L ON W/Door Key Unlock Lights up the following lights automatically when the map light assembly door linked switch is on, room light switch LH and room light switch RH of the room light assembly are on*4, the rear room light (No. 1 room light assembly) switch is set to DOOR*3, and the doors are unlocked by an unlock operation: Map light assembly Rear room light (No. 1 room light assembly)*3 Room light assembly*4 Front door ambient illumination light (Front door trim board sub-assembly)*1 Rear door ambient illumination light (Rear door trim board sub-assembly)*1*5 Center tray illumination light (Instrument panel light assembly)*1 Cup holder light (Console box pocket garnish)*1 ON 0:OFF,1:ON Main body ECU (Multiplex network body ECU) Room Light when Aprchd Lights up the following lights when the map light assembly door linked switch is on, room light switch LH and room light switch RH of the room light assembly are on*4, the rear room light (No. 1 room light assembly) switch is set to DOOR*3, and the electrical key transmitter sub-assembly is brought near the vehicle*2: Map light assembly Rear room light (No. 1 room light assembly)*3 Room light assembly*4 Front door ambient illumination light (Front door trim board sub-assembly)*1 Rear door ambient illumination light (Rear door trim board sub-assembly)*1*5 Center tray illumination light (Instrument panel light assembly)*1 Cup holder light (Console box pocket garnish)*1 ON 0:OFF,1:ON Main body ECU (Multiplex network body ECU) Inside Foot Light Turns on the following lights: Center tray illumination light (Instrument panel light assembly)*1 Cup holder light (Console box pocket garnish)*1 ON 0:OFF,1:ON Main body ECU (Multiplex network body ECU) Light Control Dims the following lights when the power switch is on (IG) and the shift lever is moved to any position other than P: Front door ambient illumination light (Front door trim board sub-assembly)*1 Rear door ambient illumination light (Rear door trim board sub-assembly)*1*5 Center tray illumination light (Instrument panel light assembly)*1 Cup holder light (Console box pocket garnish)*1 ON 0:OFF,1:ON Main body ECU (Multiplex network body ECU) Interior Light Control Lights up the following lights: Map light assembly Rear room light (No. 1 room light assembly)*3 Room light assembly*4 Front door ambient illumination light (Front door trim board sub-assembly)*1 Rear door ambient illumination light (Rear door trim board sub-assembly)*1*5 Center tray illumination light (Instrument panel light assembly)*1 Cup holder light (Console box pocket garnish)*1 ON 0:OFF,1:ON Main body ECU (Multiplex network body ECU) Interior Illumination Light Turns on the following lights: Front door ambient illumination light (Front door trim board sub-assembly)*1 Rear door ambient illumination light (Rear door trim board sub-assembly)*1*5 ON 0:OFF,1:ON Main body ECU (Multiplex network body ECU) *1: w/ Ambient Illumination Light *2: w/ Entry Function *3: w/ Room Light (for Slide Switch Type) *4: w/ Room Light (for Push Switch Type) *5: for Sedan or Wagon Customizing with the multi-display Turn the power switch on (IG). Enter the following menus: MENU / Setup / Vehicle / Vehicle customisation / Lights settings. Select the setting by referring to the table below. Display Default Content Setting Relevant ECU Interior Lights Auto-off Timer 15 sec. Changes the lighting time of the following lights that are operated by the timer function when the map light assembly door linked switch is on, room light switch LH and room light switch RH of the room light assembly are on*3, and the rear room light (No. 1 room light assembly) switch is set to DOOR*2: Map light assembly Rear room light (No. 1 room light assembly)*2 Room light assembly*3 Front door ambient illumination light (Front door trim board sub-assembly)*1 Rear door ambient illumination light (Rear door trim board sub-assembly)*1*4 Center tray illumination light (Instrument panel light assembly)*1 Cup holder light (Console box pocket garnish)*1 Off, 7.5 sec., 15 sec., 30 sec. Main body ECU (Multiplex network body ECU) *1: w/ Ambient Illumination Light *2: w/ Room Light (for Slide Switch Type) *3: w/ Room Light (for Push Switch Type) *4: for Sedan or Wagon Here are window settings for a Hybrid HB Power Window Tester Display Description Default Setting ECU Door Key P/W Up Function to close the power windows using the mechanical key OFF 0:OFF,1:ON Main body ECU (Multiplex network body ECU) Door Key P/W Down Function to open the power windows using the mechanical key OFF 0:OFF,1:ON Main body ECU (Multiplex network body ECU) P/W Up W/ Transmit Function to close the power windows using the key OFF 0:OFF,1:ON Main body ECU (Multiplex network body ECU) P/W Down W/ Transmit Function to open the power windows using the key OFF 0:OFF,1:ON Main body ECU (Multiplex network body ECU) D Window Auto Up Function to enable or disable the auto up function for the driver door power window using the multiplex network master switch assembly. ON 0:OFF,1:ON Front door window regulator assembly (for Driver Door) P Window Auto Up Function to enable or disable the auto up function for the front passenger door power window using the power window regulator switch assembly ON 0:OFF,1:ON Front door window regulator assembly (for Front Passenger Door) RR Window Auto Up Function to enable or disable the auto up function using the rear power window regulator switch assembly (for RH door) ON 0:OFF,1:ON Rear door window regulator assembly (for Rear RH Door) RL Window Auto Up Function to enable or disable the auto up function using the rear power window regulator switch assembly (for LH door) ON 0:OFF,1:ON Rear door window regulator assembly (for Rear LH Door) P Window Auto Up From Driver Function to enable or disable the remote auto up function for the front passenger door power window using the multiplex network master switch assembly ON 0:OFF,1:ON Front door window regulator assembly (for Front Passenger Door) RR Window Auto Up From Driver Function to enable or disable the remote auto up function for the rear RH door power window using the multiplex network master switch assembly ON 0:OFF,1:ON Rear door window regulator assembly (for Rear RH Door) RL Window Auto Up From Driver Function to enable or disable the remote auto up function for the rear LH door power window using the multiplex network master switch assembly ON 0:OFF,1:ON Rear door window regulator assembly (for Rear LH Door) D Window Auto Down Function to enable or disable the auto down function for the driver door power window using the multiplex network master switch assembly ON 0:OFF,1:ON Front door window regulator assembly (for Driver Door) P Window Auto Down Function to enable or disable the auto down function for the front passenger door power window using the power window regulator switch assembly ON 0:OFF,1:ON Front door window regulator assembly (for Front Passenger Door) RR Window Auto Down Function to enable or disable the auto down function using the rear power window regulator switch assembly (for RH door) ON 0:OFF,1:ON Rear door window regulator assembly (for Rear RH Door) RL Window Auto Down Function to enable or disable the auto down function using the rear power window regulator switch assembly (for LH door) ON 0:OFF,1:ON Rear door window regulator assembly (for Rear LH Door) P Window Auto Down From Driver Function to enable or disable the remote auto down function for the front passenger door power window using the multiplex network master switch assembly ON 0:OFF,1:ON Front door window regulator assembly (for Front Passenger Door) RR Window Auto Down From Driver Function to enable or disable the remote auto down function for the rear RH door power window using the multiplex network master switch assembly ON 0:OFF,1:ON Rear door window regulator assembly (for Rear RH Door) RL Window Auto Down From Driver Function to enable or disable the remote auto down function for the rear LH door power window using the multiplex network master switch assembly ON 0:OFF,1:ON Rear door window regulator assembly (for Rear LH Door) Enter the following menus: Customize Setting / Wireless Door Lock. Select the setting by referring to the table below. Wireless Door Lock Tester Display Description Default Setting ECU P/W Wireless Ope Buzz Function to turn the wireless power window buzzer response on or off ON 0:OFF,1:ON Main body ECU (Multiplex network body ECU) Enter the following menus: Customize Setting / Security. Select the setting by referring to the table below. Security Tester Display Description Default Setting ECU Window Open Warning Function to enable or disable the window open warning ON 0:OFF,1:ON Main body ECU (Multiplex network body ECU)1 point
-
Have to wait and see. Certainly with the Aygo, which uses a different system to Touch 2/MM17, they use a different head unit for smartphone integrated models, and retro-fitting isn't possible to older units or those without smartphone integration.1 point
-
I'm in the same boat. I love the car but shocked beyond belief at the lack of smartphone integration (android for me). I hope they do add it and allow it to be retrospectively added to Corollas. I intended to keep the car 7-10 years ,so that long without smartphone integration is crazy and certainly would make me look elsewhere in future (as much as I like the car!)1 point
-
Any chance of retrofitting this feature (and also Android Auto) to models already issued? Mine is from March 2019 and I hope I can add that at some point.1 point
-
There is one easy way to test the pouches. Just put the key into one and try to get into your own car. When the car fails to open, take the key out of the pouch and open the car as normal. That is what I did and it worked perfectly. I'm satisfied they do what they say they do. I bought a pair from Amazon for a fiver. Just checked the reviews first to make sure they were OK. On one pouch with some negative reviews it was because that particular pouch had two pockets inside, one protected and the other not. Some people were using the wrong bit.1 point
-
Hi Mike, In theory what they do is prevent a signal from escaping from the pouch & therefore unable to be boosted/relayed by people stealing vehicles. I don't claim to be an expert nor have I used any but from what I have read it seems that, like in most things, there are good & bad ones available for sale (also, that they have to be used correctly i.e. fully closed so that no signal can escape at any point). As I am known for believing in redundancy/backups I would probably disable the key fob sending via the key press sequence & then put in a Faraday pouch/biscuit tin etc. ... 😛 When I bought my latest Avensis I deliberately went for a lower spec. with a mechanical key rather than a smart fob (my previous T Spirit had smart fob but not one that you could stop sending via a key press sequence).1 point
-
Hi Scott. You seem an intelligent man to me and always give accurate and informative answers. In your opinion do the Faraday Pouches work, i.e. do they stop the signal from the key, stop/start system stop your signal being amplified at the front door should a thief be trying to steal the car. Many regards, Mike.1 point
-
It's very important to change the oil, no matter what Toyota says. 40.000 miles is a okay, but never 100.000. Imagine going 100 mph or towing a 1000 kg caravan. The only thing that makes the car move is a 1 inch steelbelt, protected by a thin oil film. About oil replacement : I've seen some YouTube videos, and the oil is poured from the top, through the engine bay. The trick is to know wich bolt to remove. Measurement is a tricky procedure, the amount has to be just right. The software must be reset to learn that new oil has been added.1 point
-
For UK specification Auris with CVT transmission there is no scheduled replacement just a level check every 4 year/40,000 miles. This may vary on a non UK spec car.1 point
-
They do have a Torque converter, no clutch plate
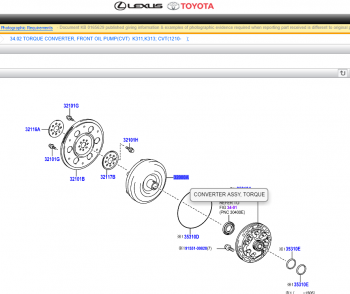 1 point
 -
It’s good to see other saddos on the forum! When I decided to look for a nearly new RAV4 Hybrid I wanted a grey leather interior and sunroof. I eventually found one (but in Decuma Grey which I had to compromise on) and had to travel 300 miles to get it. Negotiating a deal on my Subaru over the phone wasn’t easy. My son also has my saddo gene - he flew from here in Dorset to Edinburgh to view a Subaru Legacy Spec B as there were virtually none for sale in the U.K. Fortunately he bought it. I’ve also often been a little perverse over the years and insisted on buying non-mainstream cars like the Citroen DS23 Safari and CX (both supremely comfortable) and Saab 900 Turbo 16v S (appalling ride quality). So I suppose the PHV appeals in the same unconventional way. But it’s got nearly everything right, except perhaps the ridiculous boot. We can live with that as we do most of our long journeys in a camper van. incidentally, on the subject of poor dealers, I drove 60 miles to a main dealer for a test drive in PHV and they hadn’t bothered to charge the battery! I did some research on Car Gurus and discovered they’d had the cat for over six months and probably thought I was another time waster.1 point
-
Hi This is Crofters sons here. Unfortunately as of Monday night (5th) crofter passed away from complications of his illness. He didn't suffer, he went quietly with his family around him. we knew he loved looking through this forum and helped any way he could. He talked alot about things he seen on here. Thank you for all the entertainment you gave him and this forum was his biggest interest. please keep up the good work. RIP Crofter0 points